Imaginary Landscape Chalk Drawing
- ArtfulMommy

- Mar 17, 2023
- 3 min read
Updated: Aug 31, 2023
Here is a fun project that works for just about any grade level. From 3rd grade all the way up through high school, students will feel successful with this project. This year I taught it to my 5th graders and they LOVED it! They made Imaginary Landscape drawings using torn paper stencils and chalk pastels, read on to learn the simple technique. This project is super low prep and your students are guaranteed to love it!

ART HISTORY
The first thing I do is introduce my students to the American artist Arthur Dove by showing them a powerpoint of his work. Dove is best known for his abstract landscapes and is considered by some to be the first American abstract painter. When I showed his work to my 5th graders the whole class was quiet and lots of hands were raised, they were totally engaged. They love looking at and discussing art.
When discussing Dove's work I ask them what they see. This is a great time to explain abstract art. I explain that art doesn't always have to look like something and in fact there is a range in abstraction, from representational, to completely nonrepresentational. The artist has the freedom to edit things out and simplify. I remind them that it is always a good idea to walk up close to a work of art to read the title. Sometimes if you can't figure out what a work of art is about just by looking at it, the title may give you a hint.
After looking at Arthur Dove I tell them that they are going to be creating an imaginary landscape. I tell them they can think of a place and try to recreate it from memory, or they can come up with something totally new from their imagination.
Materials Needed: 12x18 white paper, copy or scrap paper for tearing, chalk pastels, newspaper and examples of Arthur Dove's work.
TECHNIQUE
Next, I demonstrate the technique (see photos below). You will need copy paper or scrap paper for tearing and a good, large sheet of paper for making the landscape on (12x18), plus chalk pastels. You also may want to have newspapers handy. You can give each child one sheet of newspaper to put their final drawing in. Or you can use spray fixative, or aerosol hair spray to help the chalk stay put.
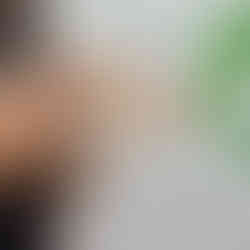
I ask them to draw their name in pencil on the back of their paper (NO chalk on the back). Next, I demonstrate how to tear the shape of a mountain. Then I lay this shape onto my drawing paper and draw chalk along the edge of the TORN paper (see images below). I tell them that they can blend right there on the edge of the torn paper by adding more than one color, using their fingers, blend the chalk down onto their drawing paper. I also show them how to create an enclosed stencil. Fold a piece of paper in half, tear out a half circle, open it up and they will have the stencil shape of a circle. Apply chalk to the edges of the torn paper sun and blend to the center. I tell them to repeat this technique until their entire paper is covered with chalk. You will get lots of oooohs and aaaahhs during this demo!


Inevitably a few kids will ask if they can use scissors. I try to discourage them, but it's up to you, if they are trying to make something super intricate sometimes they do need scissors. However, I find that having them use torn paper helps free up students, especially the ones who tend to be perfectionists. Perfectionism can be the demise of creativity.
DESIGN ELEMENTS AND PRINCIPLES OF ART
Before they start you might want to go over techniques for creating SPACE in a work of art. For example, remind them that objects that are closer should appear larger than objects that are far away. Demo overlapping...things closer will overlap things in the distance. With high school students you can even talk about things like atmospheric perspective and how things that are further away will appear much lighter and may have a blue/purple tint (think mountains in the distance).
Let them work! This is usually a two day project. I always have them start with a small half sheet of copy paper, I tell them it is their rough draft, and this helps them perfect the technique before they start the big one. Have fun!


Comments