The most amazing high school art project ever!
- ArtfulMommy

- Feb 10, 2019
- 3 min read
Updated: Aug 31, 2023
Have you ever wanted to have your students create an expressive work of art, but didn't know where to start? Last year I took a workshop at the Expressive Arts Institute in San Diego. It was an amazing weekend that opened up my mind to the possibilities of working through emotions in art. There was one exercise that I really loved and I immediately saw how it could benefit teenagers. I tweaked it a little bit for my high school art class, and I can honestly say it was the best art project I have ever done with them! I call this the Life Line project.

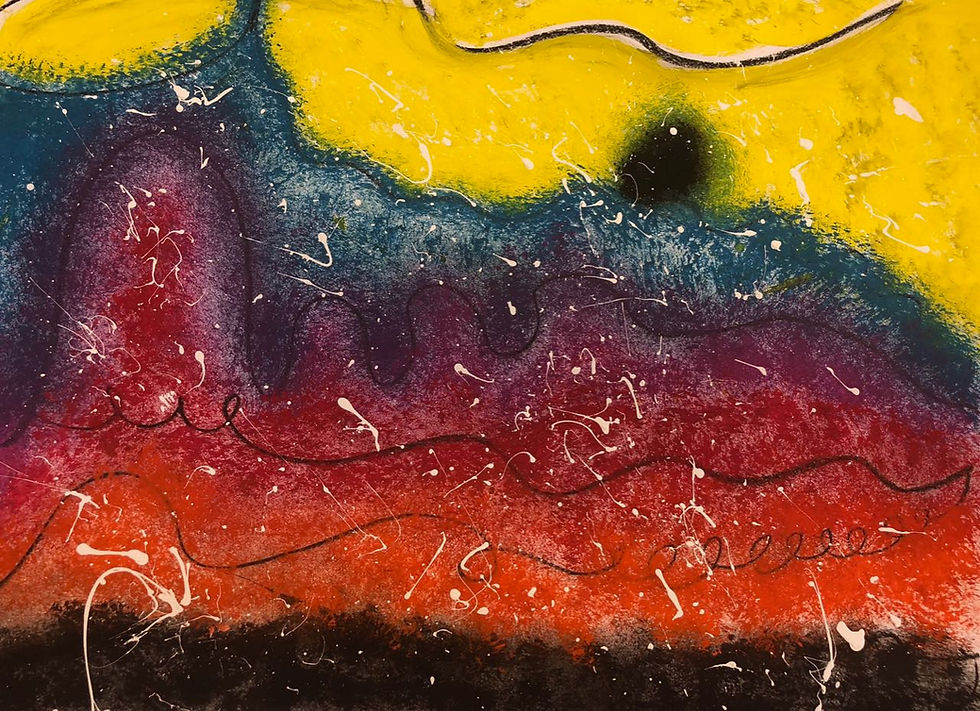
In this process based art exercise they will draw a line that represents their life. It could go up and down, twist and turn, etc. Then they will add one color, then more colors. Doing this sort of Expressive art is a cathartic and powerful experience!
They will ask you if they are doing it right and you will need to remind them that there is no right or wrong way to do this.
Be prepared to see some of the most beautiful, expressive paintings unfold in front of your eyes. The best part about this project is EVERY kid will feel successful. I had kids in my classes who rarely ever participated, but every single student did this project AND LOVED it!
Instructions:
I always like to start art projects by showing my students works of art that are in a similar style. Before this project, you could show your students some of the Abstract Expressionists, such as: Jackson Pollock, Mark Rothko, and Willem de Kooning.
Give each student one large piece of paper, a drawing board and some masking tape. If you don't have drawing boards, don't worry about it, they can work directly on the table. Show them how to tape around the edges of their paper so that the paper sticks to the drawing board. Nice straight lines will appear around the edges when they later pull the tape off. (Again, they could work directly on a table, no board or tape).
Give each student a piece of vine charcoal and tell them not to do anything with it until you give them further instructions.
Tell students that there is no right or wrong way to do the next part of this drawing. Also tell them there are no mistakes so no one will be getting a new piece of paper. Ask them to draw a line with the vine charcoal that tells the story of their life. Start with birth and end with today. It could go up and down, in circles, squiggles, patterns etc., anything goes, but it should be ONE CONTINUOUS LINE. Tell them you want to see the good parts and the bad parts! Give them about 5 minutes to do this and tell them to put their vine charcoal down when they are done. Wait for everyone to finish before moving on.
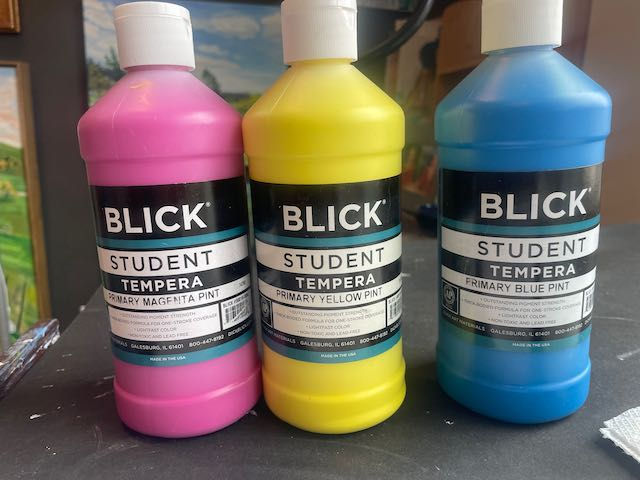
Pass out one or two large paint brushes to each student and a paper plate.
Tell them to look at their drawing and find the spot that their attention seems most drawn to. Maybe it's the feelings that the spot brings up, or maybe they just like the line there. Ask them to think about what color that area should be. Walk around the room and squirt a small amount of their color choice onto their paper plate.
Tell them to place this color in that area that most draws in their attention. Instruct them to use up all of this first color, then they can then go get whatever other colors that they think their painting needs. Have all the paints in an accessible location for them.
Step back and watch. Some students might finish more quickly than others, you could let them do a second one.
Materials:
Large thick paper, the bigger the better!
Vine charcoal (you could substitute with pencil, marker, etc.)
Big fat paintbrushes
Tempera paint (or acrylic paint)
Cups for water
Paper towels
Paper plates
Large drawing boards (optional)
Masking tape (optional)


Great idea!!! I can't wait to try this in my classroom. Thank you for sharing <3